Welcome to the Slacks Pattern Instructions. Today I’m going to show you how to draft this pattern step by step. Before starting, it’s important to know that any pants pattern is a difficult pattern to get right. It took me between 5-10 prototypes to get the right fit, so don’t worry if the same happens to you. It might be frustrating but I promise you it’s worth it! You can draft slacks from the trousers foundation but in this post I’ll show you how to do it from scratch.
Measurements
The first step of this Slacks Pattern Instructions is to take the measurements.The first step of this slacks pattern instructions is to look at what measurements are needed. Wear the normal underwear you’d wear under the slacks and be careful not to tighten the measuring tape too much. This pattern is just one of many prototypes, so don’t worry if the measurements are not super precise.
WAIST CIRCUMFERENCE

Measure the circumference of your waist. Your waist sits below your rib-cage and is normally the thinest part of your torso. I’ll show you how to modify it into a low-waist or a high-waist later on.
HIP CIRCUMFERENCE

Measure around the widest part of your hips. This isn’t always on your hip bone. If you have a prominent ass, it’s better if you measure the front and arch measurements (measured from side to side).
TROUSERS LENGTH

This is the length of your trousers and it’s measured from the waist. I’d advise you to measure until the ankle bone and you can always shorten them later.
HIP DEPTH

This is measured from the waist to the hip (where you measured the circumferences) on the side of your body.
CROTCH DEPTH

Sit on a flat surface and measure the distance from your natural waist to that flat surface. This is measured on the side of your body.
CROTCH LENGTH

Measure from the front waist to the back waist following the shape of your crotch. This measurement is used to check the pattern before prototyping.
A side from the main measurements, there’s some optional ones to check your patterns before prototyping:
- Upper thigh circumference: Measure around the upper thigh. With this measurement you can make sure the slacks are not too tight around your thigh.
- Knee circumference: Measure around your bended knee. With this measurement you can make sure the slacks will fit around your knee and will account for mobility.
- Ankle circumference: Measure around your heel and ankle to make sure the thinest part of the slacks will fit around your foot.
Instructions
Step 1 – Structure

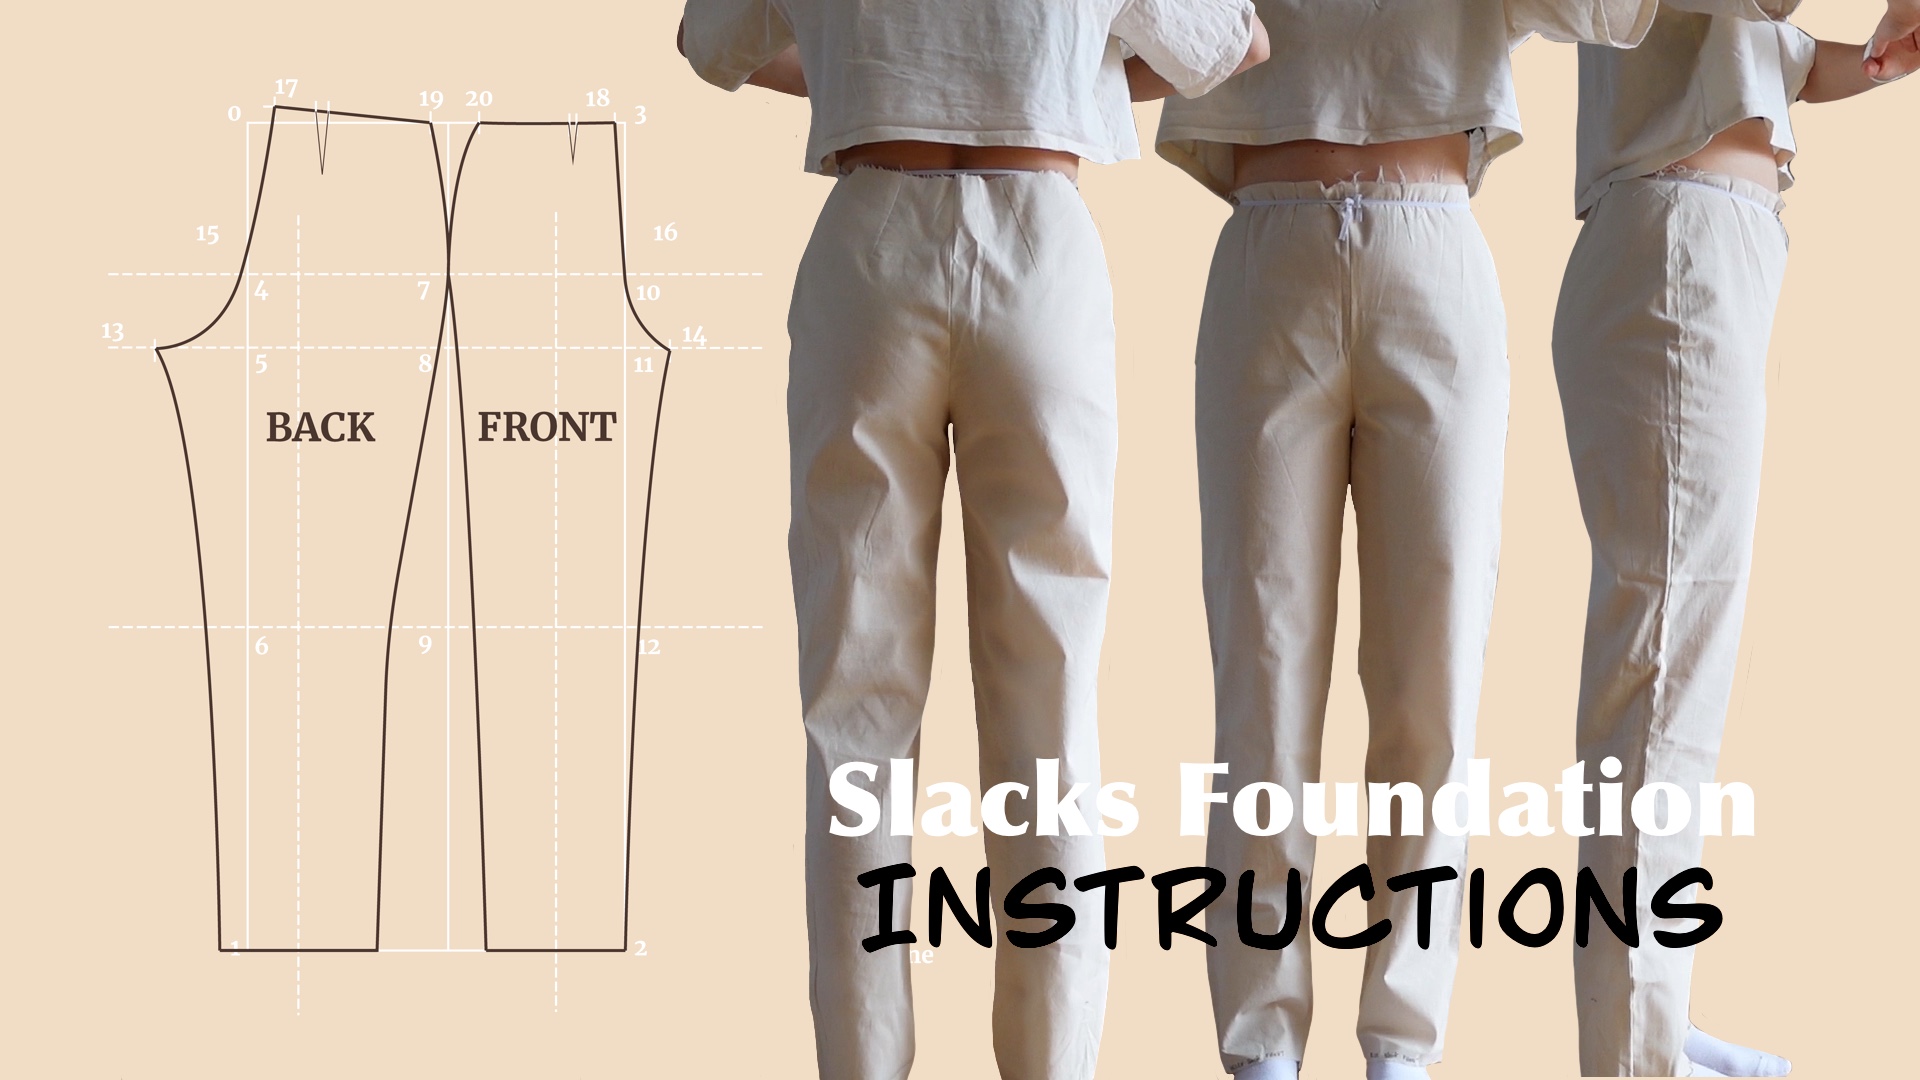
Step number one is to build the structure of our slacks foundation. We start at the top left and mark 0.
- 0 – 1: Trousers length measurement
- 1 – 2: Half the hip circumference plus 1.25cm
- Finish drawing the rectangle
- Divide the structure: From the line 0-1 half way to 1-2 plus 1cm. The front is on the right and the back is on the left.
Step 2 – Main Lines

Once the main structure is ready, let’s draw the main lines that will define the shape of the trousers
- The line 0 – 3 is the Waist Line
- 0 – 4: Waist to hip measurement. This is the Hip Line. Mark 4,7 and 10
- 0 – 5: Crotch depth + 1.5cm. This is the Crotch Line. Mark 5, 8 and 11
- The line 1 – 2 is the Ankle Line
- 1 – 6: Half the distance between the crotch line and ankle line + 2.5cm. This is the Knee Line. Mark 6, 9 and 12.
Step 3 – Crotch Curve

Let’s start drawing the actual trousers. We’re going to start by shaping the crotch curve.
- 5 – 13: Half of the distance between 5 and 8 minus 2cm. This is the back crotch extension.
- 11 – 14: One quarter of the distance between 8 and 11. This is the front crotch extension
- 0 – 15: Draw a line half way between the waist line and the crotch line. Mark where this line crosses the main rectangle.
- 0 – 17: 3.25cm to the right and 1.75cm up
- 3 – 18: 0.5cm to the left
- Back curve: Draw a curve from 13 that goes 5cm outside of 5, through 15 and to 17.
- Front curve: Draw a curve from 14 that goes 3.75cm outside of 11, through 10 and to 18.
Step 4 – Waist

Next step is to draw the Waist. For that we’ll need to make some assumptions about darts.
- 17 – 19: 1/4 of the waist circumference + dart measurement + 0.5 cm ease (optional)
- 18 – 20: 1/4 of the waist circumference + dart measurement + 0.5 cm ease (optional)
Darts are our way to create rounder shapes in the pattern. Every body will need different measurements. The rules are:
- Darts should be maximum 3 cm wide. After that they should be divided by 2.
- 2 darts are used for larger hips/small waist and 1 dart for more rectangular bodies.
- The same stands for the belly
As a standard dart measurement you can use:
- Front: 1 darts of 1.5cm.
- Back: 1 darts of 2.5cm.
Step 5 – Darts

As explained before, darts will depend on your body. This is the standard way of drawing them but use the ones that suit you best.
- On the back side (left on the drawing) we’ll draw 1 dart of 2.5cm. It is placed at 9.5cm from 0.
- On the front side (right on the drawing) we’ll draw 1 dart of 1.5cm. It is placed 7.5cm to the left of 3.
The dart on the back is 12cm long and the one on the front is 7.5cm long.
Step 6 – Leg lines

To define the leg lines, we need to find the crease line. That is the line that divides the trouser legs in the middle.
- 8 – back crease-line: Half the distance 8 – 13 plus 0.5cm
- 8 – front crease-line: Half the distance 8 – 14 plus 0.5cm
Draw a line perpendicular to the crotch line. From there we can draw the width of the trouser hem:
- Back: 10cm on each side
- Front: 9cm
These measurements are standard and can variate depending on the desired width. Normally the back width is bigger than the front one. In the image you can see I also add some standard measurements for the knees. This is not completely necessary but it gives more of a slim version.
Step 7 – The Slacks

Now you have all the points to draft the trousers.
- Back: Draw a curve from 19 to 7 and then to your ankle width. For the inside of the leg draw a line from 13 with an inward curve to the ankle width.
- Front: Draw a curve from 20 to 7 and then to your ankle width. For the inside of the leg draw a line from 14 with an inward curve to the ankle width.
The slacks are known for defining the shape of your buttocks so I would advice to add a curve from 7 to the hemline instead of a straight line.
And there you go, you have your trouser foundation pattern! There are a couple of checks you can do to make sure the fit will be good enough:
- Check the upper thigh, knee and ankle circumferences and compare them to your pattern. The pattern should always be bigger than the real measurements.
- Compare the crotch length in the pattern and the real measurement. The pattern should be the same or longer than the actual length.
- Measure the side seam for both front and back patterns. They should be the same measurement.
Thank you for using this Slacks Pattern Instructions. For more information on how to modify this pattern, click here
I also made a video with all these explanations:
One response to “Drafting Instructions – Free Slacks Pattern”
Me encanta patrón base pantanlón mujer.
Gracias. 🙂